Christmas Gingerbread Fridge Cake

Baking, Recipes, Uncategorized

Here’s a super quick recipe for you to try over the festive period. Perfect to use up chocolate from the selection boxes and biscuits left over from the biscuit tins. It’s ridiculously indulgent, but it is Christmas after all, and Christmas is all about excess!

Ingredients

200g milk or dark chocolate (or a mixture), chopped

150g butter, cubed

100g shortbread fingers

100g gingernut biscuits

100g dried cranberries

25 g pistachios

1tbsp golden syrup

1/2 tsp orange extract

For the topping

100g milk chocolate, melted

1 pack of mini gingerbread men (aprox. 25)

Method

  1. In a bowl, over a pan of simmering water, melt together the butter, chocolate, golden syrup & orange extract.
  2. Crush your biscuits roughly with a rolling pin or food processor. I like the biscuit to be quite chunky. Roughly chop the cranberries & pistachios.
  3. Mix the biscuits, cranberries and pistachios into the melted chocolate mixture.
  4. Pour into a square tin lined with greaseproof paper, and press down so the mixture is even and pushed into the corners.
  5. Leave to set in the fridge, then pour the melted milk chocolate overn the top. Top with your mini gingerbread men.
  6. Leave to set in the fridge again, then slice into squares.
  7. Enjoy!

gingerbread-tiffin-1-web

A girl with an appetite for all things creative,

Maria x

Food Styling & Photography Masterclass

Food, Photography

Hi everyone,

Last Saturday (17th) I was lucky enough to attend a masterclass in food styling & photography run by the Guardian. After a bit of a shock alarm (not used to an early wake-up call on the weekends) I got up and headed to the swanky Guardian offices at Kings Cross.

After a cuppa, we made a start. We all introduced ourselves – lots of professional photographers, beginners & all levels in between but we all had one thing in common though I think, which was enthusiasm. We were then introduced to the lovely ladies running the masterclass – Jill Mead; Photographer & Rosie Reynolds; Food Stylist. They made everyone feel so very welcome. I learnt lots of tips in the talks they gave us & it was so lovely to hear them talk so passionately about their subjects.

Figs.jpg

We then had a practical demonstration, where I picked up some tips on lighting & a bit about the best lenses to use. I now want a macro lens so I better get saving those pennies. I also did however, feel that I knew quite a lot of what was being spoken about which was great for my confidence as I don’t always believe in myself. All my practising and constant research is obviously working!

After lunch (which was fabulous, I had mushroom stroganoff, salad & chocolate cake) we started to take our own photos. We bought along a selection of our own props and were provided with some scones, fruit & veg, jam etc. I didn’t really feel like my practical session was on my side that day, I took a few photos but I think the most valuable part of the day for me was the talks in the morning and in fact sharing my knowledge & ideas with others & looking at others work & finding out about what they do. I wasn’t at all disappointed that my practical inspiration wasn’t on my side that day, as I gained so much!

I am looking forward to going on a shoot with Jill at some point in the near future.

For lots more foodie pics & to see what I get up to follow my Instagram –  @mariablackstone or Twitter.

A girl with an appetite for all things creative,

Maria x

Plum Jam

Food, Recipes, Uncategorized

One of life’s simple pleasures has got to be a slice of hot, buttery toast & homemade jam served with a cup of tea, or coffee on a drizzly weekend morning. Lazing around the house, in comfy clothes watching the rain drops fall on the window.

This jam for me was a bit of an experiment. I went to Garson’s Farm & picked some plums & bought some apricots from their amazing farm shop. The apricot jam, which funnily enough I thought would turn out better isn’t quite right. However, I’ve decided that you can buy it in the shops & it’s much less hassle. This plum jam however, tastes amazing which is good news, as I made about 5 jars.

I thought jam making would be quite easy, but turns out it was quite a stressful experience for me. I had to boil my jam for a fair amount of time, to bring it to the consistency needed. It was so worth it though …

 Ingredients

  • 1kg plums (I used Victoria plums) stoned & quartered
  • 1kg white, granulated sugar
  • 1tsp ground cinnamon
  • 100ml water
  • tbsp lemon juice
  • knob of butter

Method

  1. Begin by sterilising your jars, I washed mine in hot soapy water then placed them in a low oven to dry. Keep your jars warm here until you are ready to fill them.
  2. Place the plums and the water in a large saucepan, and cook on a low heat for about ten minutes until the plums start to soften.
  3. Add the sugar, cinnamon and lemon to the pan.
  4. Dissolve the sugar slowly, without boiling the mixture. This takes about ten minutes.
  5. Once the sugar has dissolved, bring to a rolling boil, and cook until reaching a jammy consistency. This is 105*c on a sugar thermometer. You can also test it, by putting some plates in the freezer, and spooning some mixture on the cold plate and leave to cool. It should wrinkle slightly when you push it with your finger. This can take anywhere from 5 minutes, but it actually took me about 25 minutes.
  6. When ready, take off the heat and stir in the butter – this helps to disperse any scum on the top. Leave to cool for about 10 – 15 minutes and then ladle in to your hot jars. Screw on the lids straight away to seal them, and leave to cool.
  7. Serve on hot buttered toast, or spoon into the bottom of a pastry case and top with almond cake filling for a delicious twist on a Bakewell tart.

It makes great gifts for Christmas, simply add a homemade label with some ribbon, or be greedy and keep all the jars for yourself.

Enjoy!

A girl with an appetite for all things creative,

Maria x


Happy Birthday Doris

Baking, Photography, Uncategorized

A cake I made for a friend’s grandmas 99th birthday. Happy Birthday Doris.

Vanilla sponge filled with butter cream & summer berry jam. Topped with fresh berries, macarons & fresh flowers.

If you’d like me to make you a cake, please get in touch.

DSC_2574

A girl with an appetite for all things creative,

Maria x

Spiced Rhubarb Compote

Food, Photography, Uncategorized

It’s that time of year again where gorgeous pink rhubarb is in season. I love roasting it and revealing its beautiful vibrant pink colour oozing with sweet juices infused with clementine, vanilla and spices.

I stumbled upon this recipe which I adapted from Waitrose when I was creating work for one of my final year projects at university. I created large arrangements from a recipes ingredients. The series is entitled Don’t Play With Your Food’ and depict a recipe’s ingredients arranged in a way to express the beauty of natural foods – their different colours, shapes, textures and characters. The other recipes I chose were Lentil Curry, Summer Fruits with a Lime, Mint & Vanilla Syrup, a Blood Orange & Beetroot Salad, and a Pistachio & Pomegranate cake. You can view the series here. The series stems from my passion for food and cooking. The images highlight that food is fun and enjoyable and aims to encourage people to think about the food that they eat in a similar way.

I adapted the recipe slightly – using some signiture spice from Waitrose, that was left over from Christmas. I substituted the cinnamon stick and star anise for a teaspoon of this.

Ingredients – see the original recipe here

  • 1 pack of rhubarb – cut into 5-6cm sticks
  • 2 clementines – one peeled, both cut into 1 cm slices
  • 1 vanilla pod – split lengthways with the seeds scraped out
  • 60g light soft brown sugar
  • 2 tbsp maple syrup
  • 1 tsp Waitrose signature spice (or you can use a mix of cinnamon, star anise, nutmeg etc)

Method

  1. Preheat your oven to 200*c or 180*c fan.
  2. In a roasting dish, add the rhubarb, clementine slices, sugar, vanilla (seeds & pod).
  3. Cover the roasting dish with tinfoil and roast in the oven for 15 minutes.
  4. Remove from the oven, add the maple syrup and return to the oven, this time uncovered and roast for a further ten minutes until the rhubarb has softened slightly and it’s perfectly pink surrounded by the cooking juices.
  5. Leave to cool and then enjoy!

This is perfect served for breakfast on top of yoghurt, the vivid pink rhubarb and its juices bleeding into the bleak white of the yoghurt. I tend to blend my rhubarb with a stick blender as my mum and I prefer the smooth consistency. For a dessert idea swirl some rhubarb through natural yoghurt or whipped cream and serve with meringue. It’s simply delicious.

Happy Tuesday!

A girl with an appetite for all things creative,

Maria x

Mulled Wine Jelly

Food, Recipes

Hello,

I hope everyone had a lovely Christmas, filled with lots of food & love. I’m apologising for the lack of posts in the past couple of months. I got a new internship, and was working 7 day weeks for a while, but I have now left my weekend job and for once in a very long time feel settled and fairly happy. I am loving my internship & am looking forward to what 2016 holds for me. I have set my self some personal goals, I’d like to remind my self that these aren’t simply New Year’s resolutions that won’t make it past January. Instead goals that I’d like to aim for and hopefully achieve by the end of the year. I’m not going to beat myself up about them if I don’t complete them, as I don’t know what life holds but I will work incredibly hard for them.

Onto the recipe, which is adapted from a Jamie Oliver recipe. If you have any left over red wine from the heavy festive period, or any cream left over from all those desserts then this is the perfect recipe for you. I used a bottle of mulled wine (the type that’s already infused and spiced) but you can use some red wine and add those festive flavours, such as cinnamon, star anise & cloves. To his recipe I added a clementine, mascarpone cream, which was actually left over from the filling of our Christmas Eve yule log. But just use what you have, double cream is fine!

Ingredients

300ml red wine or mulled wine
300ml cranberry juice
50g sugar
1 cinnamon stick
A grating of fresh nutmeg
2 clementines
5 gelatine sheets
4 tablespoons double cream
Zest of 1 clementine
Icing sugar to taste

Method

  1. Place the wine, cranberry juice, sugar and cinnamon in a large pan. Add the nutmeg and prick the clementines with a fork. Add to the pan and heat slowly until the sugar has dissolved. If you’re using plain red wine you will want to leave the mixture to infuse.
  2. Soak the gelatine in cold water for 5 minutes. Bring the wine back to a simmer (if you let it infuse). Squeeze the water out of the gelatine and add to the simmering wine mixture.
  3. Stir well until the gelatine dissolves. Combine both mixtures and pour into 6 glasses.
  4. Set in the fridge.
  5. To serve, whip your double cream to soft peaks, add icing sugar to your desired sweetness & add in the zest of one clementine. Dollop on some of your cream & serve with friends & family!

Mulled Wine Jelly 1

Enjoy the next few days & have a lovely new year.

A girl with an appetite for all things creative,

Maria x

Halloween Meringue Tartlets

Baking, Recipes

The nights are drawing in and the clocks have gone back which means winter is well on its way. First though we have Halloween to look forward to. Personally, this isn’t really a big deal for me – I’m more of a festive, ‘I love Christmas’ kind of girl. A bit like Elf really, without the costume.

However some people do love it and go all out, so I thought I’d have some fun with a couple of recipes. Which reminds me, I totally still need to find some kind of Halloween outfit – not a lover of fancy dress. I’ll post another later in the week too. Perfect for you to make for your parties, or to indulge in alone to make your self feel better about giving lots of sweets away to ‘trick or treaters’ (I usually prefer eating the treat sized bags of chocolates instead of handing them out, greedy I know).

This recipe is hugely inspired by the Meringue Girls and their new book ‘Everything Sweet’ which is available to buy here on Amazon. It is stunning, both the recipes and the photography, shot by another inspiration, David Loftus.

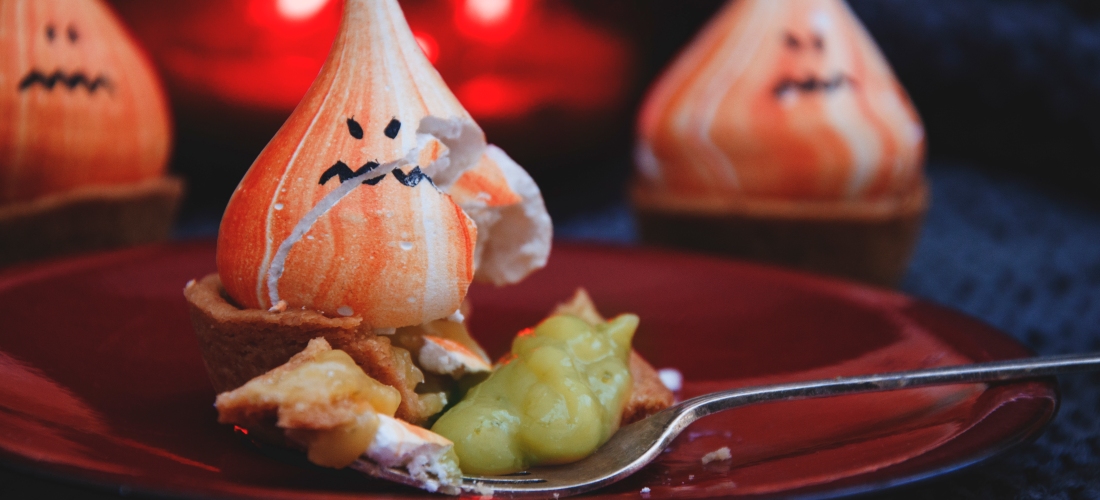
I’ve used their meringue recipe and made their little pumpkin meringue kisses to top my crisp pastry tartlets which are filled with lime curd – the most tasty ‘goo’ you’ll be exposed to this Halloween. For the pastry I used a delicious recipe from Good Food Magazine by Cassie Best – it’s crisp, sweet, and easy to work with, for all those who may be a little frightened of making pastry. Alternatively, you could use shop bought to save on party preparation.

Makes 24

Ingredients

Pastry

I use half of Cassie’s pastry for this recipe and you can freeze the rest for another time.

225g cold unsalted butter, diced

350g plain flour

50g icing sugar

1 egg yolk

2 tbsp water

Meringues – Meringue Girls Recipe

4 egg whites

Caster sugar – twice the amount of the weight of the egg whites

Lime Curd

Juice and zest of 3 limes

Pinch of salt

80g sugar

90g butter

4 egg yolks

Method

  1. Start by making the pastry. I used a food processor for this. Put the butter and flower in the food processor with a pinch of salt and blitz until the mixture resembles breadcrumbs. If you want to do it by hand, rub together with your fingertips. Add the sugar, and whizz or stir again to combine.

2. Add the egg yolk and water and blitz again until it forms large clumps. If the mixture seems too dry, add more water a tsp at a time, but no more than 3 tsp in total.

3. Tip this onto a work surface and knead briefly until it comes together to form a smooth dough. Avoid overworking as this will result in a tough pastry. Flatten, wrap in clingfilm and refrigerate for 30 mins or longer.

4.  When ready, roll out half of the pastry to a few mm thick, and using a pastry cutter cut to your desired size. I used a petit four tin so cut my pastry to fill these, but you can make bigger tarts if you wish.

5. Line this with some greaseproof paper and fill with baking beans or rice/lentils. Bake in the oven at 180c/160c fan for around 12 minutes. Remove the rice and paper, and bake for another few minutes until golden and crisp. We wouldn’t want any soggy bottoms. Leave to cool, until ready to use.

6. To make the meringues, weigh 4 egg whites, and then in a separate bowl weigh out double the amount of caster sugar. Put the sugar in a roasting tin lined with greaseproof paper and place in a preheated oven at 200c/180c fan for five minutes. The edges of the sugar will start to melt. Remove from the oven.

7. Meanwhile, with an electric mixer start whisking the egg whites in a grease free, clean bowl. Whisk slowly to make small bubbles, and then increase the speed until the egg whites form stiff peaks.

8. Turn the oven down to 100c and turn the mixer up to full speed. Add the hot sugar spoonful by spoonful until fully incorporated. Once all the sugar is added, whisk on high speed for 5-7 minutes until all the sugar has dissolved. The mixture should feel smooth between your fingers, with no grains of sugar.

9. Pipe the meringues, using orange food colouring. See this lovely video for help. You want your meringue bases to be the size of your tart shells so they fit on top. Place in the oven to cook for around 45 minutes – 1 hour until the meringues lift off the paper.

10. Meanwhile, make the lime curd. Put the lime zest and juice, salt, sugar and butter into a little saucepan and heat gently until the sugar and butter have melted. Remove from the heat.

11. Whisk the egg yolks in a bowl, then add to the saucepan and whisk. Return the pan to a low heat and whisk constantly as the curd starts to thicken. Do not stop whisking – we don’t want scrambled eggs. Once the curd thickens and releases a bubble or two, remove from the heat. I added a bit of green food colouring for extra halloween fun but this is optional. Place the curd in a disposable piping bag, leave to cool and then refrigerate.

12. To assemble, fill your tartlet cases with some of the lime curd – using a piping bag is easiest but you can always use a teaspoon. You can paint faces on your meringues with black food colouring and a clean paintbrush. Then top your tarts with these. Serve and enjoy!

The tangy lime curd complements the sweet meringue pumpkin which adds an element of fun that children can help with on half term next week, and will go down a treat at a party, or simply as a little afternoon treat with tea or coffee. Stay tuned for another ‘spooktacular’ recipe.

A girl with an appetite for all things creative,

Maria x

Coffee & Pecan Cake

Baking, Recipes

This week I have been mourning the loss of some fantastic TV. My Wednesday’s from now on will not be the same. Not only have we lost Bake Off, but also what I think could possibly be one of the best TV dramas to date – Doctor Foster. I pretty much spent the hour on the edge of my seat, holding my breath after getting pretty emotional after Nadia’s speech and Mary Berry’s tears on Bake Off.

I spent the finale of Bake Off eating cake, (obviously) so in remembrance of the nations beloved show, this weeks recipe is for a coffee and pecan cake. Pecan because I don’t like walnuts. Sorry walnut lovers. This is the cake which I stuffed my face with, after spending an hour at a gym class – seems logical right?! (Wrong).

Perfect with a cup of coffee mid morning catching up with pals, or for a sweet afternoon treat. Try this lovely cake, which ditches the traditional buttercream icing, as one I’m not a huge fan and two, when making cakes for what my mum calls ‘home use’ we try cutting down on fattening icings and indulgence. Yes, cakes covered in thick smooth icing, look beautiful and taste delicious but if you’re like us and need your regular dose of cake, it can be helpful to cut back sometimes. Now I’m not trying to claim this cake is healthy in anyway, that would be like saying Nutella is good for you because it contains nuts – it’s not. Although I think we all secretly wish it was! This cake is simply drizzled with some runny fondant water icing, and topped with chopped toasted pecans. If you prefer though, feel more than free to top with coffee buttercream … Just don’t come running to me when your jeans don’t fit haha!

Ingredients

6oz / 170g golden/normal caster sugar

6oz / 170g margarine or butter

3 eggs

6 oz / 170g self raising flour

3tsps instant coffee mixed its 3tsps boiling water

5oz /140g approx pecans

Icing

1stp instant coffee

1tsp water

Fondant icing sugar
Method

1. Preheat your oven to 180c or 160c fan. Line your tin with silicone paper. I used a silicone square 9 inch tin, so something similar in size, but I like to add a strip of paper in the bottom so help get the cake out the tin.

2. Begin by creaming together the sugar and margarine. I used a kitchen aid for this, but you could use an electronic whisk or do it by hand and burn the extra calories, just make sure it’s really creamy, pale and fluffy.

3. Mix in your eggs one by one, combing well between each addition, if it curdles add a spoonful of the flour.

4. Toast your pecans in a dry pan on the hob, or in the oven, until the aromas are released and they are nicely toasted. Chop into small pieces.

5. Set aside a handful of your pecans, and add the rest to the flour and mix. This ensures an even distribution in your cake. Add in the coffee mixture into the butter, sugar and egg mixture. Then add in your flour and nuts and mix lightly until combined.

6. Pour the mix into your tin and bake in the oven for around 25 minutes, dependent on your tin size, until baked. To test, pierce the sponge with a skewer in the middle. If it come out clean and the sponge is springy to touch it’s done. Remove fro, the oven and leave it to cool in the tin, when cool remove from the tin and place on a serving plate/cake stand.

7. To make the icing, mix together the coffee and water until dissolved. Then add enough icing sugar to make a run in consistency, but thick enough to hold. The amount will vary and whenever I make icing, I tend to just add more icing sugar, or more water until I get my desired consistency and I usually end up with too much. So apologies on behalf of the lack of measurements here. Using a fork or a whisk drizzle the icing over the cake. Then sprinkle with the left over toasted pecans.

This slideshow requires JavaScript.

A handy tip when making sponges – a general rule I use is double the amount of flour, sugar and butter in ounces to eggs. Eg. 6oz to 3 eggs, 8oz to 4 eggs. I find it easier to remember than using grams.

I am stating my new internship on Monday and am super excited, as well as being a little nervous. Wish me luck and I will post some spooktacular recipes at the weekend ready for Halloween!

Lots of love,

A girl with an appetite for all things creative,

Maria x

Chocolate Orange Truffles

Food, Recipes

Hello lovely readers!

First of all I want to apologise for not posting in a while.

As you know I started my new part time job and internship meaning I was working seven days a week and I underestimated how tired I’d actually be. It was also my graduation last week so I was trying to get ready for that – paint nails, prep outfits and pack (all the girly things haha).

I’ve also been more anxious than ever so have been dealing with that too, so although I had a recipe prepared to post, it hasn’t been my priority so I’m sorry for that.

This recipe is for some chocolate orange truffles. Perfect for gifts to friends and loved ones. I was inspired for this recipe by some truffles I continue to buy, by Monty Bejangles. They are so rich and luxurious. Also, my friends have been amazing to me recently and they definitely deserved a treat. A thank you goes out to my official taste testers Ally & Ellie.

This recipe is super easy, and requires little effort – just a bit of setting time and getting your hands a little chocolatey. But who ever said being covered in chocolate was a bad thing?!

Makes about 30 dependent on size.

Ingredients

200g chocolate – I used a mix of milk and dark.

100ml double cream.

Few drops of orange extract – I used Sainsbury’s Taste The Difference Valencian Orange Extract.

Cocoa powder for dusting – you could use nuts too if you like

Method

1. Heat the cream in a sauce pan until it is hot but not boiling.

2. Meanwhile, chop the chocolate and place in a bowl – I used a larger but shallower bowl so that it would set quicker in the fridge.

3. Pour the cream over the chocolate and add the orange extract. Alternatively you could use the zest or experiment with your own flavour combinations.

4. Stir together until the chocolate is fully melted and combined. You may need to reheat the mix so you can place over a bowl of simmering water, or zap in the microwave on a low power – be careful not to burn it!

5. Leave to set in the fridge until firm. This should take about 4 hours but you can leave it overnight if you wish.

6. When ready to shape, sift some cocoa powder on to a plate to roll your truffles in. You could also use ground or flaked almonds or a nut of your choice. Take a small spoon of the mixture and roll into your desired shape. You may find dusting your hands with cocoa reduces the chocolatey melty mess. You can make them whatever shape you wish. Roll in the cocoa powder to cover completely.

7. Place back in the fridge to set. Serve when firm and ready for an indulgent homemade treat. Perfect with coffee or like I did, a glass of wine with my dear friends.

Why not give these a try, they make perfect presents wrapped up in cellophane with a nice ribbon and hand written tag. You can experiment with your own flavours, shapes and toppings and really personalise them. I hope you enjoy them as much as my friends and I did.

Next week I will tell you all about my graduation. A little late I know but I want to tell you all about my incredible day, and the delicious food I ate.

Hope you’re all very well, and again apologies for the delay in posting, please don’t hate me forever.

A girl with a creative appetite,

Maria x

Berry, Custard & Mascarpone Tart

Baking, Food, Recipes

Hello readers,

I am starting to get a handle on my job lists, after having parties and a trip to the Isle of Wight. I see a lot of you liked my Amaretto Gelato post last week, and next week I’ll have another alcoholic ice for you adults to enjoy (sorry kids!) but here’s a recipe you can all enjoy… a beautiful berry tart, perfect for using our beautiful British berries, that you may have picked yourself, with children or bought from the market or supermarket.

This weekend just gone, after getting back from a completely over indulgent trip to the Isle of Wight (what Grandma’s do best) I threw a small Barbecue to celebrate my sisters results from University. She got a 2.1 and I am so so proud of her, as along with studying, she worked full time, kept up a flat, found time for the gym and socialising with friends. There was about 10 of us, and we had a BBQ with the usual stuff, and then this tart, the biggest trifle you’ve probably ever seen and a surprise peanut butter and chocolate cake, which would have remained secret had my sister not gone in the garage! I had an amazing time with friends, food and drinks and we were also spoilt rotten. We each received a beautiful bunch of flowers, a Links of London Graduation charm, a Spa Weekend and £100. Thanks Mum & Dad! I may post up the recipe for the cake soon!

Berry, Custard & Mascarpone Tart

Ingredients

Pastry

225g/8oz Plain Flour

113g/4oz Lard

113g/4oz Butter

50ml (aprox.) Water

Custard (I only used half of this mixture, but why not use the rest in homemade ice-cream, or with sponge pudding. You can use all of it for a more custardy taste, or fill the extra tartlets with this mix and top with fruit)

300 ml Milk

2 Eggs + 1 Yolk

1 Vanilla Pod (or 1 tsp paste/extract)

90g Sugar

50g Cornflour

75g Butter, diced

1 Tub of Mascarpone

Assortment of Berries I used a 400g tub of Strawberries, and a mixed berry pack from Sainsbury’s (raspberries, strawberries and blueberries)

Method

1. Start by making the pastry. In a food processor (or by hand)blitz/rub together the flour and fats until breadcrumb consistency, then add the water until a dough forms, you may not need all the water, likewise you may need a little more, I’ll leave this up to you! Once combined, tip on to a surface, form a ball, flatten and wrap in clingfilm and leave to rest and chill.

2. Once chilled, roll out the pastry. Lightly flour the rolling pin and surface and roll out the pastry to a few mm thick. You want it as thin as you can make it, for a nice crisp result. I used an oblong tin, but a round one is fine. Roll the pastry onto the rolling pin and place carefully in your flan tin. Press the pastry into the edges using a wooden spoon handle, or your fingers being careful not to rip your base. Don’t worry if you do, just patch it up with some spare pastry. With any left over trimmings, you can make some mini jam tarts, or tartlet shells to fill with left over custard. Place the flan tin back in the fridge to relax, while you make the custard and remember not to trim the pastry right to the edge as otherwise it will shrink back.

3. To make the custard, place the milk, and split vanilla pod (scraping out all the lovely seeds) in a saucepan and bring to a gentle boil. In another bowl whisk together the eggs, sugar and cornflour until smooth and creamy. Once the milk has come to the boil, leave to infuse for ten minutes.

4. Brink the milk back up to the boil, then whisk into the egg mixture. Return back to the saucepan and whisk continually until boiling, and really thick. Then add the diced butter and whisk in until melted and smooth. Place in a bowl, and top the surface with clingfilm (ensuring its in contact) to stop a film forming. Leave to cool then refrigerate.

5. While the custard is chilling, preheat the oven to 180c fan/200c, fill the pastry case with parchment, and baking beans/rice/pulses and blind bake for 10-15 minutes. After this time remove the paper & beans and trim down your pastry if you so wish. Return to the oven and bake for another ten or so minutes until the pastry is nice and golden. Leave to cool.

6. When ready to assemble, mix half the custard with the mascarpone, you may want to use an electric whisk to get a really smooth consistency or just use some muscle and burn the extra calories. Spoon in the tart and smooth evenly over the pastry – don’t worry about this looking neat as you are going to pile it with berries.

7. Add your berries, I chopped the strawberries in halves and quarters for the bottom and added the raspberries and blueberries! This creative bit is up to you! Which is why I love to cook. Make it your own!

Keep your eyes peeled for next weeks post, a refreshing G&T sorbet! Time for me to go back to the job hunt! Wish me luck!

A girl with an appetite for all things creative,

Maria x