Mini Egg Blondies

Baking, Photography

Hi Everyone, 

Here is an easy and naughty treat to enjoy over the Easter holidays! Perfect to use up  any left over mini eggs – but if I’m honest, it’s more of an excuse to go and buy more mini eggs! 

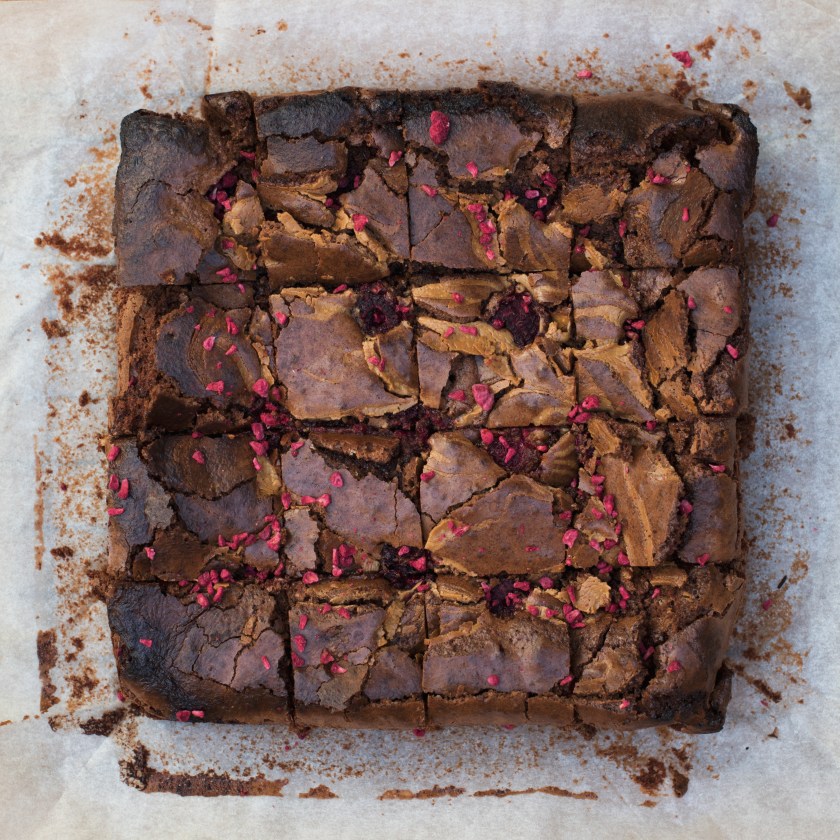
I was really pleased with how the photos turned out for these. I baked them yesterday evening, by which time all the natural light had gone (I think I was being ambitious, thinking I could make, bake and photograph them in the natural light after I got home from work at 6.30pm!) 

I decided to experiment with flash, I set up the background, put the finished bake in place, though a little warm (I was eager to get to bed) and got the work. I haven’t really shot any food with flash before, apart from my studio arrangements at university. I will definitely continue to practice with this technique as it means I can photograph and cook more for my blog in the evenings. 

My photography work can also be viewed here.

Beautiful background by Woodrow Studios

Ingredients

225g butter

200g white chocolate

175g plain flour

50g golden caster sugar

150g soft brown sugar

3 large eggs

1tsp vanilla extract

2 x 90g bags mini eggs

For decoration (optional)

3 cubes white chocolate

Handful of crushed mini eggs
Method

  1. Line a square tin (approx. 21cm square) and preheat the oven to 180*c / 160 fan.
  2. Chop the butter and chocolate into cubes and melt together in a bowl placed over lightly simmering water. The mixture may split once melted but don’t worry, this will all be combined together into one delicious mixture. Once melted, remove from the heat and leave to cool slightly. 
  3. In a seperate bowl, whisk together the eggs, sugar and vanilla until pale and fluffy, you’ll want it to leave a trail on the surface when you lift the whisk. This should take a few minutes. You will probably want to use an electric whisk or mixer for this other wise you’ll be there all night. 
  4. Pour your chocolate and butter into the egg mixture and gently combine together using a spatula. 
  5. Add your flour and fold in until well combined. 
  6. Add your mini eggs and stir.
  7. Pour into your lined tin and bake for about 30-40 minutes depending on the size of your tin. It’s cooked when you can insert a skewer and sticky cake crumbs are left but no raw cake mixture. 
  8. Leave to cool, then drizzle with some extra melted white chocolate and top with crushed mini eggs.
  9. If you can resist, leave in the fridge or somewhere cool overnight to achieve a delicious fudgy texture. In the mean time you can polish off the remaining mini eggs. (Yes, I purposely bought a family sized bag just for the decoration, don’t judge) 
  10. Enjoy! 

Don’t forget to follow my instagram to keep up to date with my foodie adventures. 

A girl with an appetite for all things creative,

Maria x

Christmas Gingerbread Fridge Cake

Baking, Recipes, Uncategorized

Here’s a super quick recipe for you to try over the festive period. Perfect to use up chocolate from the selection boxes and biscuits left over from the biscuit tins. It’s ridiculously indulgent, but it is Christmas after all, and Christmas is all about excess!

Ingredients

200g milk or dark chocolate (or a mixture), chopped

150g butter, cubed

100g shortbread fingers

100g gingernut biscuits

100g dried cranberries

25 g pistachios

1tbsp golden syrup

1/2 tsp orange extract

For the topping

100g milk chocolate, melted

1 pack of mini gingerbread men (aprox. 25)

Method

  1. In a bowl, over a pan of simmering water, melt together the butter, chocolate, golden syrup & orange extract.
  2. Crush your biscuits roughly with a rolling pin or food processor. I like the biscuit to be quite chunky. Roughly chop the cranberries & pistachios.
  3. Mix the biscuits, cranberries and pistachios into the melted chocolate mixture.
  4. Pour into a square tin lined with greaseproof paper, and press down so the mixture is even and pushed into the corners.
  5. Leave to set in the fridge, then pour the melted milk chocolate overn the top. Top with your mini gingerbread men.
  6. Leave to set in the fridge again, then slice into squares.
  7. Enjoy!

gingerbread-tiffin-1-web

A girl with an appetite for all things creative,

Maria x

Food Styling & Photography Masterclass

Food, Photography

Hi everyone,

Last Saturday (17th) I was lucky enough to attend a masterclass in food styling & photography run by the Guardian. After a bit of a shock alarm (not used to an early wake-up call on the weekends) I got up and headed to the swanky Guardian offices at Kings Cross.

After a cuppa, we made a start. We all introduced ourselves – lots of professional photographers, beginners & all levels in between but we all had one thing in common though I think, which was enthusiasm. We were then introduced to the lovely ladies running the masterclass – Jill Mead; Photographer & Rosie Reynolds; Food Stylist. They made everyone feel so very welcome. I learnt lots of tips in the talks they gave us & it was so lovely to hear them talk so passionately about their subjects.

Figs.jpg

We then had a practical demonstration, where I picked up some tips on lighting & a bit about the best lenses to use. I now want a macro lens so I better get saving those pennies. I also did however, feel that I knew quite a lot of what was being spoken about which was great for my confidence as I don’t always believe in myself. All my practising and constant research is obviously working!

After lunch (which was fabulous, I had mushroom stroganoff, salad & chocolate cake) we started to take our own photos. We bought along a selection of our own props and were provided with some scones, fruit & veg, jam etc. I didn’t really feel like my practical session was on my side that day, I took a few photos but I think the most valuable part of the day for me was the talks in the morning and in fact sharing my knowledge & ideas with others & looking at others work & finding out about what they do. I wasn’t at all disappointed that my practical inspiration wasn’t on my side that day, as I gained so much!

I am looking forward to going on a shoot with Jill at some point in the near future.

For lots more foodie pics & to see what I get up to follow my Instagram –  @mariablackstone or Twitter.

A girl with an appetite for all things creative,

Maria x

Happy Birthday Doris

Baking, Photography, Uncategorized

A cake I made for a friend’s grandmas 99th birthday. Happy Birthday Doris.

Vanilla sponge filled with butter cream & summer berry jam. Topped with fresh berries, macarons & fresh flowers.

If you’d like me to make you a cake, please get in touch.

DSC_2574

A girl with an appetite for all things creative,

Maria x

Dippy Egg Cakes

Baking, Food, Photography, Recipes

Easter may have come and gone but this recipe is perfect to use up those mini eggs and indulge just once more before we get back to working on our summer bodies! Easter is usually all about chocolate, and don’t get me wrong I LOVE chocolate, but the Creme Egg brownies have been done so I wanted to go down a different route. Easter is also about spring, yellow is the colour that comes to mind for me – daffodils, tulips and Easter chicks!

These cupcakes are inspired by the humble dippy egg, seeing as Easter is all about eggs! They have a surprise centre. A delicious, tangy lemon and passion fruit curd, that ooze like a dippy egg when cut, or bitten in to. There are a few parts to the recipe, but these can be made the day before, and assembled the next day. After all holidays are about being relaxed and fun, so why not get in your kitchen and have a go.

Makes 12

Ingredients

Sponge

6oz butter/margarine

6oz caster sugar

3 eggs

6oz self raising flour

Tsp lemon extract

Lemon curd 

I only used half for this recipe, but why not serve the rest with some meringues and cream, or spread on toast?

Zest and juice of 2 lemons

65g sugar

90g butter

4 egg yolks

Pinch of salt

4 passion fruits

Frosting

100g White Chocolate

140ml double cream (I used half an elmlea carton)

Method

Lemon Curd

1. Add the zest, juice, butter, sugar and salt in a small saucepan, and heat gently until the butter has melted and the sugar has dissolved.

2. Meanwhile whisk the egg yolks in a bowl, once the mixture in the pan has melted I added this to the egg yolks and whisked. How about making some Easter chick meringues with the left over egg whites?

3. Add this back to the saucepan and whisk continuously on a low heat until thickened, and bubbles start to appear. Ensure you whisk all the time, otherwise you’ll end up with scrambled egg!

4. Pour this into a heatproof bowl, and cover with cling film, making sure the film touches the curd directly, to stop a skin forming. Once cool enough refrigerate.

5. Once cool, scoop the flesh of four passion fruits and stir into the curd, set this aside in the fridge until ready to use.

Frosting

1. Melt the white chocolate, you can either do this in a bowl over a pan of simmering water, or in a microwave. If using a microwave, ensure you don’t burn the chocolate as it has a high sugar content.

2. Add the cream to the chocolate and using an electric whisk (or a hand whisk and some muscle) whisk the mixture till light and fluffy. It should be thick enough to resemble a light buttercream. Be careful not to over whisk, otherwise the cream will split.

3. Set aside in the fridge until ready to assemble.

Sponges

1. Preheat the oven to 180 or 160 fan and line a 12 hole cupcake pan with 12 cases.

2. I used a kitchen aid, but you can use an electric whisk or do it by hand. Beat the butter and sugar until pale and creamy.

3. Add the eggs one at a time, beating in between to ensure each egg is encorporated to avoid curdling. If it curdles, add some flour and continue. Mix in the lemon extract at this point. I used a Sainsburys taste the difference one.

4. Add the flour, and mix enough to encorporate all the flour, but don’t over mix other wise your cakes will be tough.

5. Spoon the mixture into the cases, and bake for around 20-25 minutes or until light and springy, and a skewer comes out clean.

6. Remove from the oven and allow to cool completely.

Assembly

1. Using an apple corer, or a knife cut out a hole in the centre of each cake. The deeper the more lemon curd you can fit in! Yummy!

2. Fill the holes with the curd, you can use a piping bag or a teaspoon. I found the curd was fairly runny, so using a teaspoon was easier than a piping bag.

3. Top the cakes with a spoonful of the frosting, and smooth over with a pallette knife. I aimed for a dome, to look a bit like an egg shape.

4. Top with freeze dried raspberries, and mini eggs. However, you can top with whatever you like. This for me is what baking is about! I like the tang of the dried raspberries, but you could top with a little fresh passion fruit, some flakes of white chocolate or whatever you fancy!

Check my other post for instructions on how to make the Easter chick meringues, 🐥🐣.

I hope you get in the kitchen and have a go at these, it seems complicated, but if you take it in steps its achievable  and you can impress all your friends. Feel free to send me pictures of your bakes!

A girl with an appetite for all things creative,

Maria x

Freshly Baked Bread

Baking, Food, Photography, Uncategorized

Nothing quite beats the smell of freshly baked bread filling the house. My dad is the bread baker in our house (sees himself as a bit of a Paul Hollywood, which is funny as he’s actually called Paul. He has taken over from mum and this loaf he made this weekend was pretty spectacular.

BreadBread 2

I decided to change things up on here, post pictures and maybe even some short films of food & things (especially now I’ve got my new camera). So there won’t always be a recipe but I’m hoping this small change will allow me to post more, be more creative and give you recipes that I’m really proud of, rather than rushing to put something crummy up (excuse the pun). If I don’t like this new way of doing things I’ll change it back!

A girl with a creative appetite,

Maria x

I have a new camera

Baking, Photography, Uncategorized

I’ve really fell out of routine with my blogging, during the summer I had so much free time and a lot more daylight (good for photography) so creating blog posts was fairly easy and a fun thing to do, then I got sucked into the world of work as a recent graduate and found it hard to find the time. However things are looking up and not only that but they are looking exciting. I have now been offered a job from my internship, and am enjoying having my weekends off after working a part time job at the weekends.

I have also FINALLY bought a new camera, lens and tripod. Something I’ve been saying I want to do since my second year of university. I never had the funds, as it is jolly expensive. With spending a lot of money (especially when you don’t have much) comes a lot of consideration and thinking. I finally jumped in though and got myself a beautiful Nikon D810 and a 50 mm lens. I used it last weekend and photographed these delicious brownies and my, is it a beauty of a camera. I’m excited to continue using it to create lots of beautiful images that I’m proud of.

This post is less of a recipe and more of an update of stuff, because sometimes I need to remind myself of what I’m doing and achieving. I’m currently doing some freelance design/photography work which is going well and it’s lovely to know that others think my work is good enough for them to use for their own endeavors.

I also have just entered the Pink Lady Food Photographer of the Year competition. I know that my chances are slim (or pretty much impossible) with the tough competition out there but as my mum says, to be in it to win it you have to play the game (or something like that, if any of you know my mum she has a saying for EVERYTHING).

I’ll leave you to feast your eyes on these delicious brownies, which were a Meringue Girls recipe from their book, ‘Everything Sweet’. They are made with coconut flour, which is a great gluten free alternative (but still taste extremely guilty). I swirled in some peanut butter and added in some frozen raspberries for some added peanut butter and jelly time. (I used to love that cartoon). They are extremely decadent and are in good competition to my go to Thornton’s brownie recipe.

Brownie.jpg

I will promise to try and be better with this blogging thing!

A girl with an appetite for all things creative,

Maria x

Spooky Salted Caramel Shortbread

Baking, Recipes

This is the second of my halloween inspired recipes and this one is super easy and so so delicious. Thankfully, salted caramel is still popular and wasn’t just a phase like we all thought, so this recipe is a cheats version of a caramel shortbread – using a tin of caramel resulting in a softer caramel centre making this a little messier than the standard caramel shortbread but I never heard anyone complaining of having fingers covered in sticky, delicious caramel.

Caramel shortbread is a really nostalgic treat for me. My grandma lives in the Isle of Wight. I have been going there ever since I was small. There is a cafe on the pier at Yarmouth called Gossips. I always had, and always will have a caramel slice with a hot drink or milkshake or regret my choice when I decide to be adventurous and try something else. That’s what I love about food – it evokes memory’s and fun times from our childhood, or time spent with family, friends and loved ones. So this is my version, although I’d like to add it doesn’t quite match Gossip’s but it is delicious in its own way.

I used white chocolate to create the cobweb design on top, but this can be eaten any time of year. You could simply marble the milk and white chocolate into a swirly design, or just use milk chocolate for a plain, simple finish.

Ingredients

225g plain flour

175g unsalted butter, cold and cubed

75g caster sugar

1 x 397g tin of Carnation caramel

200g milk belgian chocolate

A few cubes of white belgian chocolate

Method

  1. Start by making the shortbread base. Rub together the butter and flour with your fingertips until it resembles breadcrumbs. Stir in the sugar, and then press firmly into the base of your tin lined with a piece of greaseproof paper. I used an oblong tin, but a 9 inch square tin would work well.
  2. Put the caramel into a bowl and mix in 1/2 tsp of fine sea salt then – I ground mine with a pestle and mortar. Pour this caramel mixture onto the cooled shortbread base, spread evenly and place in the fridge to firm up slightly. It won’t go solid as using a tin of caramel results in a softer finsih.
  3. Remove the shortbread from the fridge and melt your chocolate. You can use a microwave on a low power or melt the chocolate in a bowl over a pan of hot water. Once melted, pour the chocolate onto the caramel and smooth over to create an even surface.
  4. Melt a few cubes of white chocolate and whilst still warm, using a piping bag pipe semi circles on the melted milk chocolate. Then use a cocktail stick to drag lines across the semi circles to feather the chocolate and create cobweb design. Alternatively, you could simply just pipe lines to create the cobwebs.
  5. Place in the fridge to set, and once the chocolate has hardened, you can cut into small squares, or bars to serve.

This slideshow requires JavaScript.

This is a very indulgent treat, that is truly delicous to devour with loved ones over the Halloween weekend, or any time of the year when you want a sweet, naughty treat.

After a bit of makeup practice, and some online shopping I think I have sorted my self some kind of outfit for a Halloween party I’m going to. I just hope no one asks what I am, as I’m not too sure myself. I will post a picture next week! I’m aiming for something ‘Day of the Dead’ inspired. We will see…

Enjoy your weekend, whether your raving or behaving.

A girl with an appetite for all things creative,

Maria x

Halloween Meringue Tartlets

Baking, Recipes

The nights are drawing in and the clocks have gone back which means winter is well on its way. First though we have Halloween to look forward to. Personally, this isn’t really a big deal for me – I’m more of a festive, ‘I love Christmas’ kind of girl. A bit like Elf really, without the costume.

However some people do love it and go all out, so I thought I’d have some fun with a couple of recipes. Which reminds me, I totally still need to find some kind of Halloween outfit – not a lover of fancy dress. I’ll post another later in the week too. Perfect for you to make for your parties, or to indulge in alone to make your self feel better about giving lots of sweets away to ‘trick or treaters’ (I usually prefer eating the treat sized bags of chocolates instead of handing them out, greedy I know).

This recipe is hugely inspired by the Meringue Girls and their new book ‘Everything Sweet’ which is available to buy here on Amazon. It is stunning, both the recipes and the photography, shot by another inspiration, David Loftus.

I’ve used their meringue recipe and made their little pumpkin meringue kisses to top my crisp pastry tartlets which are filled with lime curd – the most tasty ‘goo’ you’ll be exposed to this Halloween. For the pastry I used a delicious recipe from Good Food Magazine by Cassie Best – it’s crisp, sweet, and easy to work with, for all those who may be a little frightened of making pastry. Alternatively, you could use shop bought to save on party preparation.

Makes 24

Ingredients

Pastry

I use half of Cassie’s pastry for this recipe and you can freeze the rest for another time.

225g cold unsalted butter, diced

350g plain flour

50g icing sugar

1 egg yolk

2 tbsp water

Meringues – Meringue Girls Recipe

4 egg whites

Caster sugar – twice the amount of the weight of the egg whites

Lime Curd

Juice and zest of 3 limes

Pinch of salt

80g sugar

90g butter

4 egg yolks

Method

  1. Start by making the pastry. I used a food processor for this. Put the butter and flower in the food processor with a pinch of salt and blitz until the mixture resembles breadcrumbs. If you want to do it by hand, rub together with your fingertips. Add the sugar, and whizz or stir again to combine.

2. Add the egg yolk and water and blitz again until it forms large clumps. If the mixture seems too dry, add more water a tsp at a time, but no more than 3 tsp in total.

3. Tip this onto a work surface and knead briefly until it comes together to form a smooth dough. Avoid overworking as this will result in a tough pastry. Flatten, wrap in clingfilm and refrigerate for 30 mins or longer.

4.  When ready, roll out half of the pastry to a few mm thick, and using a pastry cutter cut to your desired size. I used a petit four tin so cut my pastry to fill these, but you can make bigger tarts if you wish.

5. Line this with some greaseproof paper and fill with baking beans or rice/lentils. Bake in the oven at 180c/160c fan for around 12 minutes. Remove the rice and paper, and bake for another few minutes until golden and crisp. We wouldn’t want any soggy bottoms. Leave to cool, until ready to use.

6. To make the meringues, weigh 4 egg whites, and then in a separate bowl weigh out double the amount of caster sugar. Put the sugar in a roasting tin lined with greaseproof paper and place in a preheated oven at 200c/180c fan for five minutes. The edges of the sugar will start to melt. Remove from the oven.

7. Meanwhile, with an electric mixer start whisking the egg whites in a grease free, clean bowl. Whisk slowly to make small bubbles, and then increase the speed until the egg whites form stiff peaks.

8. Turn the oven down to 100c and turn the mixer up to full speed. Add the hot sugar spoonful by spoonful until fully incorporated. Once all the sugar is added, whisk on high speed for 5-7 minutes until all the sugar has dissolved. The mixture should feel smooth between your fingers, with no grains of sugar.

9. Pipe the meringues, using orange food colouring. See this lovely video for help. You want your meringue bases to be the size of your tart shells so they fit on top. Place in the oven to cook for around 45 minutes – 1 hour until the meringues lift off the paper.

10. Meanwhile, make the lime curd. Put the lime zest and juice, salt, sugar and butter into a little saucepan and heat gently until the sugar and butter have melted. Remove from the heat.

11. Whisk the egg yolks in a bowl, then add to the saucepan and whisk. Return the pan to a low heat and whisk constantly as the curd starts to thicken. Do not stop whisking – we don’t want scrambled eggs. Once the curd thickens and releases a bubble or two, remove from the heat. I added a bit of green food colouring for extra halloween fun but this is optional. Place the curd in a disposable piping bag, leave to cool and then refrigerate.

12. To assemble, fill your tartlet cases with some of the lime curd – using a piping bag is easiest but you can always use a teaspoon. You can paint faces on your meringues with black food colouring and a clean paintbrush. Then top your tarts with these. Serve and enjoy!

The tangy lime curd complements the sweet meringue pumpkin which adds an element of fun that children can help with on half term next week, and will go down a treat at a party, or simply as a little afternoon treat with tea or coffee. Stay tuned for another ‘spooktacular’ recipe.

A girl with an appetite for all things creative,

Maria x

Coffee & Pecan Cake

Baking, Recipes

This week I have been mourning the loss of some fantastic TV. My Wednesday’s from now on will not be the same. Not only have we lost Bake Off, but also what I think could possibly be one of the best TV dramas to date – Doctor Foster. I pretty much spent the hour on the edge of my seat, holding my breath after getting pretty emotional after Nadia’s speech and Mary Berry’s tears on Bake Off.

I spent the finale of Bake Off eating cake, (obviously) so in remembrance of the nations beloved show, this weeks recipe is for a coffee and pecan cake. Pecan because I don’t like walnuts. Sorry walnut lovers. This is the cake which I stuffed my face with, after spending an hour at a gym class – seems logical right?! (Wrong).

Perfect with a cup of coffee mid morning catching up with pals, or for a sweet afternoon treat. Try this lovely cake, which ditches the traditional buttercream icing, as one I’m not a huge fan and two, when making cakes for what my mum calls ‘home use’ we try cutting down on fattening icings and indulgence. Yes, cakes covered in thick smooth icing, look beautiful and taste delicious but if you’re like us and need your regular dose of cake, it can be helpful to cut back sometimes. Now I’m not trying to claim this cake is healthy in anyway, that would be like saying Nutella is good for you because it contains nuts – it’s not. Although I think we all secretly wish it was! This cake is simply drizzled with some runny fondant water icing, and topped with chopped toasted pecans. If you prefer though, feel more than free to top with coffee buttercream … Just don’t come running to me when your jeans don’t fit haha!

Ingredients

6oz / 170g golden/normal caster sugar

6oz / 170g margarine or butter

3 eggs

6 oz / 170g self raising flour

3tsps instant coffee mixed its 3tsps boiling water

5oz /140g approx pecans

Icing

1stp instant coffee

1tsp water

Fondant icing sugar
Method

1. Preheat your oven to 180c or 160c fan. Line your tin with silicone paper. I used a silicone square 9 inch tin, so something similar in size, but I like to add a strip of paper in the bottom so help get the cake out the tin.

2. Begin by creaming together the sugar and margarine. I used a kitchen aid for this, but you could use an electronic whisk or do it by hand and burn the extra calories, just make sure it’s really creamy, pale and fluffy.

3. Mix in your eggs one by one, combing well between each addition, if it curdles add a spoonful of the flour.

4. Toast your pecans in a dry pan on the hob, or in the oven, until the aromas are released and they are nicely toasted. Chop into small pieces.

5. Set aside a handful of your pecans, and add the rest to the flour and mix. This ensures an even distribution in your cake. Add in the coffee mixture into the butter, sugar and egg mixture. Then add in your flour and nuts and mix lightly until combined.

6. Pour the mix into your tin and bake in the oven for around 25 minutes, dependent on your tin size, until baked. To test, pierce the sponge with a skewer in the middle. If it come out clean and the sponge is springy to touch it’s done. Remove fro, the oven and leave it to cool in the tin, when cool remove from the tin and place on a serving plate/cake stand.

7. To make the icing, mix together the coffee and water until dissolved. Then add enough icing sugar to make a run in consistency, but thick enough to hold. The amount will vary and whenever I make icing, I tend to just add more icing sugar, or more water until I get my desired consistency and I usually end up with too much. So apologies on behalf of the lack of measurements here. Using a fork or a whisk drizzle the icing over the cake. Then sprinkle with the left over toasted pecans.

This slideshow requires JavaScript.

A handy tip when making sponges – a general rule I use is double the amount of flour, sugar and butter in ounces to eggs. Eg. 6oz to 3 eggs, 8oz to 4 eggs. I find it easier to remember than using grams.

I am stating my new internship on Monday and am super excited, as well as being a little nervous. Wish me luck and I will post some spooktacular recipes at the weekend ready for Halloween!

Lots of love,

A girl with an appetite for all things creative,

Maria x