Halloween Meringue Tartlets

Baking, Recipes

The nights are drawing in and the clocks have gone back which means winter is well on its way. First though we have Halloween to look forward to. Personally, this isn’t really a big deal for me – I’m more of a festive, ‘I love Christmas’ kind of girl. A bit like Elf really, without the costume.

However some people do love it and go all out, so I thought I’d have some fun with a couple of recipes. Which reminds me, I totally still need to find some kind of Halloween outfit – not a lover of fancy dress. I’ll post another later in the week too. Perfect for you to make for your parties, or to indulge in alone to make your self feel better about giving lots of sweets away to ‘trick or treaters’ (I usually prefer eating the treat sized bags of chocolates instead of handing them out, greedy I know).

This recipe is hugely inspired by the Meringue Girls and their new book ‘Everything Sweet’ which is available to buy here on Amazon. It is stunning, both the recipes and the photography, shot by another inspiration, David Loftus.

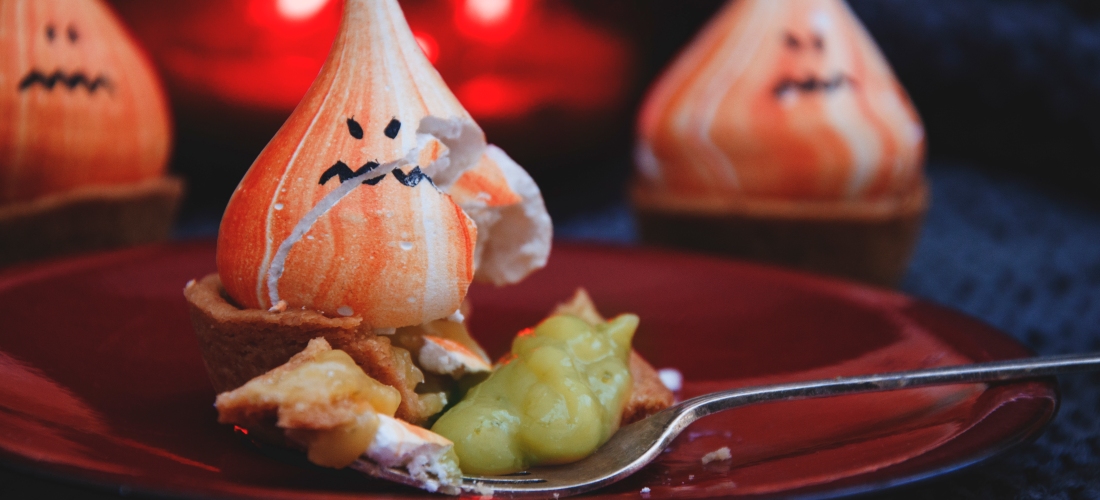
I’ve used their meringue recipe and made their little pumpkin meringue kisses to top my crisp pastry tartlets which are filled with lime curd – the most tasty ‘goo’ you’ll be exposed to this Halloween. For the pastry I used a delicious recipe from Good Food Magazine by Cassie Best – it’s crisp, sweet, and easy to work with, for all those who may be a little frightened of making pastry. Alternatively, you could use shop bought to save on party preparation.

Makes 24

Ingredients

Pastry

I use half of Cassie’s pastry for this recipe and you can freeze the rest for another time.

225g cold unsalted butter, diced

350g plain flour

50g icing sugar

1 egg yolk

2 tbsp water

Meringues – Meringue Girls Recipe

4 egg whites

Caster sugar – twice the amount of the weight of the egg whites

Lime Curd

Juice and zest of 3 limes

Pinch of salt

80g sugar

90g butter

4 egg yolks

Method

  1. Start by making the pastry. I used a food processor for this. Put the butter and flower in the food processor with a pinch of salt and blitz until the mixture resembles breadcrumbs. If you want to do it by hand, rub together with your fingertips. Add the sugar, and whizz or stir again to combine.

2. Add the egg yolk and water and blitz again until it forms large clumps. If the mixture seems too dry, add more water a tsp at a time, but no more than 3 tsp in total.

3. Tip this onto a work surface and knead briefly until it comes together to form a smooth dough. Avoid overworking as this will result in a tough pastry. Flatten, wrap in clingfilm and refrigerate for 30 mins or longer.

4.  When ready, roll out half of the pastry to a few mm thick, and using a pastry cutter cut to your desired size. I used a petit four tin so cut my pastry to fill these, but you can make bigger tarts if you wish.

5. Line this with some greaseproof paper and fill with baking beans or rice/lentils. Bake in the oven at 180c/160c fan for around 12 minutes. Remove the rice and paper, and bake for another few minutes until golden and crisp. We wouldn’t want any soggy bottoms. Leave to cool, until ready to use.

6. To make the meringues, weigh 4 egg whites, and then in a separate bowl weigh out double the amount of caster sugar. Put the sugar in a roasting tin lined with greaseproof paper and place in a preheated oven at 200c/180c fan for five minutes. The edges of the sugar will start to melt. Remove from the oven.

7. Meanwhile, with an electric mixer start whisking the egg whites in a grease free, clean bowl. Whisk slowly to make small bubbles, and then increase the speed until the egg whites form stiff peaks.

8. Turn the oven down to 100c and turn the mixer up to full speed. Add the hot sugar spoonful by spoonful until fully incorporated. Once all the sugar is added, whisk on high speed for 5-7 minutes until all the sugar has dissolved. The mixture should feel smooth between your fingers, with no grains of sugar.

9. Pipe the meringues, using orange food colouring. See this lovely video for help. You want your meringue bases to be the size of your tart shells so they fit on top. Place in the oven to cook for around 45 minutes – 1 hour until the meringues lift off the paper.

10. Meanwhile, make the lime curd. Put the lime zest and juice, salt, sugar and butter into a little saucepan and heat gently until the sugar and butter have melted. Remove from the heat.

11. Whisk the egg yolks in a bowl, then add to the saucepan and whisk. Return the pan to a low heat and whisk constantly as the curd starts to thicken. Do not stop whisking – we don’t want scrambled eggs. Once the curd thickens and releases a bubble or two, remove from the heat. I added a bit of green food colouring for extra halloween fun but this is optional. Place the curd in a disposable piping bag, leave to cool and then refrigerate.

12. To assemble, fill your tartlet cases with some of the lime curd – using a piping bag is easiest but you can always use a teaspoon. You can paint faces on your meringues with black food colouring and a clean paintbrush. Then top your tarts with these. Serve and enjoy!

The tangy lime curd complements the sweet meringue pumpkin which adds an element of fun that children can help with on half term next week, and will go down a treat at a party, or simply as a little afternoon treat with tea or coffee. Stay tuned for another ‘spooktacular’ recipe.

A girl with an appetite for all things creative,

Maria x

Coffee & Pecan Cake

Baking, Recipes

This week I have been mourning the loss of some fantastic TV. My Wednesday’s from now on will not be the same. Not only have we lost Bake Off, but also what I think could possibly be one of the best TV dramas to date – Doctor Foster. I pretty much spent the hour on the edge of my seat, holding my breath after getting pretty emotional after Nadia’s speech and Mary Berry’s tears on Bake Off.

I spent the finale of Bake Off eating cake, (obviously) so in remembrance of the nations beloved show, this weeks recipe is for a coffee and pecan cake. Pecan because I don’t like walnuts. Sorry walnut lovers. This is the cake which I stuffed my face with, after spending an hour at a gym class – seems logical right?! (Wrong).

Perfect with a cup of coffee mid morning catching up with pals, or for a sweet afternoon treat. Try this lovely cake, which ditches the traditional buttercream icing, as one I’m not a huge fan and two, when making cakes for what my mum calls ‘home use’ we try cutting down on fattening icings and indulgence. Yes, cakes covered in thick smooth icing, look beautiful and taste delicious but if you’re like us and need your regular dose of cake, it can be helpful to cut back sometimes. Now I’m not trying to claim this cake is healthy in anyway, that would be like saying Nutella is good for you because it contains nuts – it’s not. Although I think we all secretly wish it was! This cake is simply drizzled with some runny fondant water icing, and topped with chopped toasted pecans. If you prefer though, feel more than free to top with coffee buttercream … Just don’t come running to me when your jeans don’t fit haha!

Ingredients

6oz / 170g golden/normal caster sugar

6oz / 170g margarine or butter

3 eggs

6 oz / 170g self raising flour

3tsps instant coffee mixed its 3tsps boiling water

5oz /140g approx pecans

Icing

1stp instant coffee

1tsp water

Fondant icing sugar
Method

1. Preheat your oven to 180c or 160c fan. Line your tin with silicone paper. I used a silicone square 9 inch tin, so something similar in size, but I like to add a strip of paper in the bottom so help get the cake out the tin.

2. Begin by creaming together the sugar and margarine. I used a kitchen aid for this, but you could use an electronic whisk or do it by hand and burn the extra calories, just make sure it’s really creamy, pale and fluffy.

3. Mix in your eggs one by one, combing well between each addition, if it curdles add a spoonful of the flour.

4. Toast your pecans in a dry pan on the hob, or in the oven, until the aromas are released and they are nicely toasted. Chop into small pieces.

5. Set aside a handful of your pecans, and add the rest to the flour and mix. This ensures an even distribution in your cake. Add in the coffee mixture into the butter, sugar and egg mixture. Then add in your flour and nuts and mix lightly until combined.

6. Pour the mix into your tin and bake in the oven for around 25 minutes, dependent on your tin size, until baked. To test, pierce the sponge with a skewer in the middle. If it come out clean and the sponge is springy to touch it’s done. Remove fro, the oven and leave it to cool in the tin, when cool remove from the tin and place on a serving plate/cake stand.

7. To make the icing, mix together the coffee and water until dissolved. Then add enough icing sugar to make a run in consistency, but thick enough to hold. The amount will vary and whenever I make icing, I tend to just add more icing sugar, or more water until I get my desired consistency and I usually end up with too much. So apologies on behalf of the lack of measurements here. Using a fork or a whisk drizzle the icing over the cake. Then sprinkle with the left over toasted pecans.

This slideshow requires JavaScript.

A handy tip when making sponges – a general rule I use is double the amount of flour, sugar and butter in ounces to eggs. Eg. 6oz to 3 eggs, 8oz to 4 eggs. I find it easier to remember than using grams.

I am stating my new internship on Monday and am super excited, as well as being a little nervous. Wish me luck and I will post some spooktacular recipes at the weekend ready for Halloween!

Lots of love,

A girl with an appetite for all things creative,

Maria x
Berry, Custard & Mascarpone Tart

Baking, Food, Recipes

Hello readers,

I am starting to get a handle on my job lists, after having parties and a trip to the Isle of Wight. I see a lot of you liked my Amaretto Gelato post last week, and next week I’ll have another alcoholic ice for you adults to enjoy (sorry kids!) but here’s a recipe you can all enjoy… a beautiful berry tart, perfect for using our beautiful British berries, that you may have picked yourself, with children or bought from the market or supermarket.

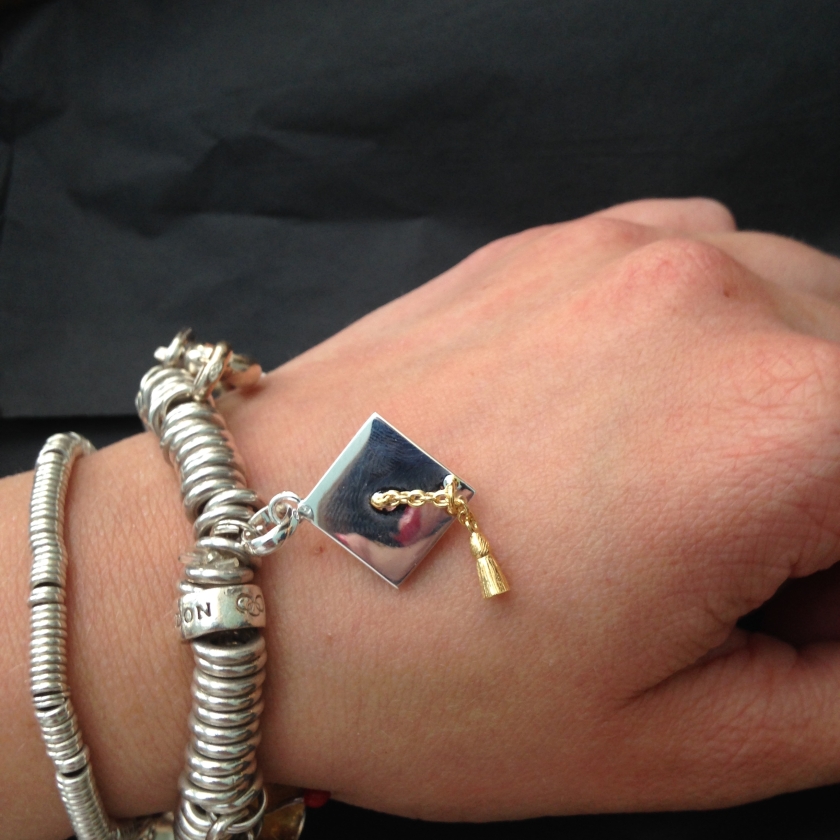
This weekend just gone, after getting back from a completely over indulgent trip to the Isle of Wight (what Grandma’s do best) I threw a small Barbecue to celebrate my sisters results from University. She got a 2.1 and I am so so proud of her, as along with studying, she worked full time, kept up a flat, found time for the gym and socialising with friends. There was about 10 of us, and we had a BBQ with the usual stuff, and then this tart, the biggest trifle you’ve probably ever seen and a surprise peanut butter and chocolate cake, which would have remained secret had my sister not gone in the garage! I had an amazing time with friends, food and drinks and we were also spoilt rotten. We each received a beautiful bunch of flowers, a Links of London Graduation charm, a Spa Weekend and £100. Thanks Mum & Dad! I may post up the recipe for the cake soon!

Berry, Custard & Mascarpone Tart

Ingredients

Pastry

225g/8oz Plain Flour

113g/4oz Lard

113g/4oz Butter

50ml (aprox.) Water

Custard (I only used half of this mixture, but why not use the rest in homemade ice-cream, or with sponge pudding. You can use all of it for a more custardy taste, or fill the extra tartlets with this mix and top with fruit)

300 ml Milk

2 Eggs + 1 Yolk

1 Vanilla Pod (or 1 tsp paste/extract)

90g Sugar

50g Cornflour

75g Butter, diced

1 Tub of Mascarpone

Assortment of Berries I used a 400g tub of Strawberries, and a mixed berry pack from Sainsbury’s (raspberries, strawberries and blueberries)

Method

1. Start by making the pastry. In a food processor (or by hand)blitz/rub together the flour and fats until breadcrumb consistency, then add the water until a dough forms, you may not need all the water, likewise you may need a little more, I’ll leave this up to you! Once combined, tip on to a surface, form a ball, flatten and wrap in clingfilm and leave to rest and chill.

2. Once chilled, roll out the pastry. Lightly flour the rolling pin and surface and roll out the pastry to a few mm thick. You want it as thin as you can make it, for a nice crisp result. I used an oblong tin, but a round one is fine. Roll the pastry onto the rolling pin and place carefully in your flan tin. Press the pastry into the edges using a wooden spoon handle, or your fingers being careful not to rip your base. Don’t worry if you do, just patch it up with some spare pastry. With any left over trimmings, you can make some mini jam tarts, or tartlet shells to fill with left over custard. Place the flan tin back in the fridge to relax, while you make the custard and remember not to trim the pastry right to the edge as otherwise it will shrink back.

3. To make the custard, place the milk, and split vanilla pod (scraping out all the lovely seeds) in a saucepan and bring to a gentle boil. In another bowl whisk together the eggs, sugar and cornflour until smooth and creamy. Once the milk has come to the boil, leave to infuse for ten minutes.

4. Brink the milk back up to the boil, then whisk into the egg mixture. Return back to the saucepan and whisk continually until boiling, and really thick. Then add the diced butter and whisk in until melted and smooth. Place in a bowl, and top the surface with clingfilm (ensuring its in contact) to stop a film forming. Leave to cool then refrigerate.

5. While the custard is chilling, preheat the oven to 180c fan/200c, fill the pastry case with parchment, and baking beans/rice/pulses and blind bake for 10-15 minutes. After this time remove the paper & beans and trim down your pastry if you so wish. Return to the oven and bake for another ten or so minutes until the pastry is nice and golden. Leave to cool.

6. When ready to assemble, mix half the custard with the mascarpone, you may want to use an electric whisk to get a really smooth consistency or just use some muscle and burn the extra calories. Spoon in the tart and smooth evenly over the pastry – don’t worry about this looking neat as you are going to pile it with berries.

7. Add your berries, I chopped the strawberries in halves and quarters for the bottom and added the raspberries and blueberries! This creative bit is up to you! Which is why I love to cook. Make it your own!

Keep your eyes peeled for next weeks post, a refreshing G&T sorbet! Time for me to go back to the job hunt! Wish me luck!

A girl with an appetite for all things creative,

Maria x

Wimbledon Strawberry & Lime Tarts

Baking, Food, Recipes

Wimbledon Tennis commences on the 29th June, and is one of the sports I love to watch, it reminds me of summer and I always admire the players’ strength and determination – they are the only person responsible for their win and I think that takes a lot of mental strength let alone the physical strength. I have always been pants at sport so I admire most sports men and women to be honest with you (also a bit jealous).

When I think of Wimbledon, I think of tennis, and strawberries, so I thought up a little creative recipe, which takes a little time and care but is well worth it. These little tarts would be perfect to pack up for a picnic to eat on Murray Mount/Henman Hill, or to have with afternoon tea whilst you celebrate the final with friends & family, although let’s be honest you don’t really need the tennis to enjoy these tarts, because they are simply divine all on their own. The lime in the strawberries makes these tarts really refreshing and cuts through the rich creamy custard, and crumbly pastry. The perfect mouthful (or three).

Ingredients

Pastry

200g Plain Flour

1 tbsp Icing Sugar

50g Lard, Diced

50g Butter, Diced

1/2-1 Medium Egg, Beaten

Strawberry Base

400g Strawberries, washed and diced

Zest and Juice of Half a Lime

1 tbsp Caster Sugar

Custard Topping

300ml Milk

1 Vanilla Pod/1tsp of Vanilla paste/Extract

2 Large Eggs plus 1 Egg Yolk

50g Cornflour

75g Soft Unsalted Butter, Diced

Jelly Top

1 Pack of Lime Jelly

1/2 Pint of Water

3-4 cubes of melted white chocolate

Method

You can make the jelly, custard and pastry cases the day before, and assemble when needed.

Start by making the jelly

1. Melt the jelly cubes with a bit of water in a microwave, then top up with water to create 1/2 pint of liquid.

2. Line a tin with clingfilm roughly 20  by 20 cm (but this is just a guide) then pour in the jelly mix so its roughly 1/2 cm thick. Leave this in the fridge to set.

Pastry

1. In a food processor blend together the ingredients, minus the egg to form a breadcrumb like texture, add the egg bit by bit until the mixture comes together to form a dough. Be careful not to over mix, as this will activate the gluten giving you a tough pastry. If you do not have a food processor, you can rub together the flour, sugar and fats with your finger tips, then add in the egg and knead together.

2. Wrap in cling film and leave to chill for about half an hour to allow the dough to relax.

3. Once its chilled, you can start to roll out the pastry, I do this between two sheets of clingfilm which allievates the need for extra flour and it makes much less mess. I used a 24 hole (4.5cm) petit four tin, but if you dont have this you could simply make your tarts a little bigger. Try and roll the pastry as thin as you can, it requires a delicate hand, and some patience (as I discovered) as the dough is quite fragile, but the end result is so short and delicious, almost like shortbread. I used a 7cm cutter to do this, and trimmed the edges, with a smaller cutter to neaten – this is optional, but remember to not trim too much as the pastry can shrink.

4. Fill the pastry cases with squares of non-stick paper, and fill with baking beans/rice/dried pulses and refridgerate again to rest before baking for about 15-20 minutes. At this point preheat your oven to 200c/180c fan.

Tarts

5. Bake in the oven for about 15 minutes, then remove the paper and baking beans, you can brush the insides with a little egg white left from the custard filling but this is optional. Return to the oven for another 5 minutes, until golden brown, as Mary Berry would say, we don’t want any soggy bottoms.

6. Leave to cool fully in the tin before carefully transferring to a wire rack.

Whilst the pastry is relaxing you can start the custard filling (créme mousseline)

Custard Filling

1. Bring the milk & vanilla pod just to the boil, then remove from the heat and allow to infuse for ten minutes.

2. Meanwhile, whisk together the sugar, eggs, egg yolk, and cornflour until smooth and creamy.

3. Remove the vanilla pod from the milk, then pour through a sieve onto the egg mixture, whisking well.

4. Pour this mixture back into the washed saucepan and set over a medium-low heat and stir constantly to ensure that lumps don’t form. Do this until the mixture boils and thickens – this should take about four minutes. The mixture should be thick enough to pipe. Stir in the butter whilst still warm.

5. Transfer to a bowl, and cover the custard directly (so that it touches the custard) with clingfilm, to stop a skin forming, leave to cool then refridgerate until needed.

Strawberries

1. In a bowl, add the diced strawberries, lime zest and juice and sugar, stir and refridgerate until needed. With the other half of the lime why not make my Green Twister  Smoothie.

Assembly

Now all of the constituent parts are ready, comes the fun bit – the assembly.

1. Simply take half a teaspoon of the strawberries and fill each tart case – the strawberries would have created some liquid, try and avoid filling the cases with lots of liquid as the pastry will go soggy.

2. Pipe over the top the custard filling, you may want to give it a beat to loosen it after its firmed up in the refrigerator. If you don’t have a piping bag, you can use a teaspoon and spoon a bit in each one to fill the cases nearly to the top.

3. I then cut the jelly using a 3.5cm cutter and piped on a swirl of white chocolate, and topped the tarts with this. This bit is optional, but completes the tennis theme.

There you have it, 24 delicous tarts – don’t worry if some break, mine did too – just use the bits of pastry with some of the left over custard and call it cooks perks! I know this recipe is quite long, and contains a few different parts, but I promise you these are well worth the effort!

Let me know what you think, I hope you enjoy them as much as I, and my family did.

A girl with an appetite for all things creative,

Maria x

Rhubarb & Custard Ice Cream

Baking, Food, Recipes

My mum receives an organic fruit and veggie box every week packed full of seasonal goodies from the wonderful people at Abel & Cole, who like me are lovers of collaboration. We received some organic rhubarb and some strawberries in our box and I thought to my self that summer is finally upon us, despite the weather taking a bit of a turn at the start of June. What better way to kick off the season than with some homemade ice cream, indulgent and luxurious. This flavour is a classic combination that some may remember from childhood boiled sweets.

How about serving it with some mini meringue kisses, (a great way of using up the egg whites) and some strawberries marinated in Amaretto liquor, a twist on the classic Eton mess or why not add some jelly, to make an adult version of a child’s favourite – knicker bocker glory.

There are a few different stages to this recipe, and a fair few ingredients, but please don’t be put off as the stages can be made in advance and refrigerated, ready for assembly the next day.

Serves 4-6

Ingredients

Ice Cream Base

300ml Milk

100g Granulated Sugar

3 Egg Yolks

1tsp Vanilla Bean Paste/Extract or 1 Vanilla Pod

500g tub Mascarpone Cheese

140ml Double Cream

Rhubarb Compote – Adapted from a Waitrose Recipe

Aprox. 400g Rhubarb (about 1 pack/bunch)

1 Vanilla pod, split / Vanilla Bean Paste/Extract

2tbsp Maple Syrup

60g Light Brown Sugar

2 Clementines, or a Splash of Orange Juice

1/2 tsp Ground Cinnamon, or 1 Cinnamon Stick

Meringues – Meringue Girls Recipe

Marinated Strawberries

400g Punnet of British Strawberries

1tbsp Maple Syrup or Caster Sugar

1tbsp Amaretto Liquor

Method

Start by making the Rhubarb Compote

1. Preheat the oven to 200 degrees c and chop the rhubarb into sticks roughly 6-7cm long.

2. Place the rhubarb, vanilla, spices, sugar and clementines (peeled and sliced/or the juice) in an oven proof dish.

3. Cover with foil and place in the oven to bake for 15 minutes, then uncover and baste with the maple syrup and cook uncovered for another 10 minutes or until the rhubarb in tender.

4. Leave to cool, then remove the vanilla pod and cinnamon stick before blending to a smooth puree. Set aside in the fridge.

Next, prepare the Ice Cream Base

1. Combine the milk, vanilla and half the sugar in a saucepan and bring to just below boiling point. Remove the pan from the heat, and set aside for about 15 minutes to infuse the vanilla into the milk.

2. In a heatproof bowl, whisk together the egg yolks with the rest of the sugar and beat until thick and pale. It’s best to use an electric whisk for this, but if you don’t have one just use a little elbow grease – think of all the calories you’ll save, ha!

3. Bring the milk back to the boil, then slowly pour the milk into the egg mixture, ensuring to whisk steadily as the milk is added – we don’t want to end up with scrambled eggs.

4. This bowl can either be placed over a bowl of simmering water, or you can return the custard to the saucepan. If you are going to use the second option, ensure the pan is on a heat diffuser and use a thermometer to ensure you do not overheat the custard. Use a wooden spoon, or spatula to continually stir the custard untill it reaches 85 degrees c, or is thicker in consistency. It should coat the back of the spoon, and hold its shape when you run your finger through it.

5. Pour into a bowl and cover directly with cling film to stop a film forming, and then once cool refrigerate.

6. Once cool, beat the mascarpone, to loosen it and then beat in the custard mixture, along with the double cream. The mascarpone gives the ice cream a luxuriously thick and creamy texture, but you can substitute this for a 300ml carton of double cream instead if you want to (instead of the mascarpone and additional double cream).

7. This is ready to be poured into an ice cream maker, until it is thick and luxurious. If you do not have an ice cream maker you could try pouring it into a tub, freezing and churn it by hand every half hour/to an hour to break up the ice crystals. However, for best results use an ice cream maker, as the hand method will result in a less smooth result.

8. Once the ice cream is set, marble through 3/4 of the rhubarb puree. We will use the other 1/4 to drizzle over the ice cream later. Pour in a tub, and leave to firm up in the freezer.

Marinated Strawberries

1. Hull and quarter the strawberries, and add to a bowl.

2. Spoon over the maple syrup or sugar and add the liquor, mix together and set aside in the fridge, until ready to serve. If you are making this for children, you can leave the liquor out.

Assemble 2-3 scoops of ice cream, a spoonful of strawberries, a few meringues and jelly if you so wish and top with a little of the left over compote, and enjoy.

Rhubarb &Custard

A girl with an appetite for all things creative,

Maria x

Happy Birthday To Me

Baking, Food

Despite feeling terribly poorly for my birthday, I had a lovely time. Yesterday, I went up to London with my mum, dad and sister. We walked from Victoria to Trafalgar Square and had a coffee before meeting up with two family friends. We headed to The National Portrait Gallery, where we saw the Grayson Perry Who Are You? exhibition, I also saw the Taylor Wessing Photographic Portrait Prize exhibition. Both were extremely good.

We then walked to Oxford Street and then went to Covent Garden to have dinner, in Gourmet Burger Kitchen and we then stopped into Paul’s Patisserie and bought an apricot tart to eat for dessert when we all got home. I also popped to the Moomin shop. (unhealthy obsession) and bought some goodies!

It was a lovely, but tiring day.

Today, despite feeling poorly, I had a lovely day at my work experience with Good Food, I then came home to presents and a homemade Chinese and chocolate mousse for dessert made by my lovely mum, and then birthday cake which was made by me and inspired by the Meringue Girls. It was a lovely chilled out evening.

Here is my cake, Chocolate Fudge Cake, with white chocolate ganache icing, meringue kisses and hazelnut praline. Delicious.

Thanks for reading,

A girl with an appetite for all things creative,

Maria x

Fireworks Night

Baking, Food, Recipes

On the 8th November, we had our local firework display. I hadn’t been to this in a few years as I was always at university, but luckily I was home this weekend. So I asked mum if we could do what we used to always do, and have a dinner party after the display with close friends. On the Friday, I got up and made homemade chilli con carne, two huge pots of it. As always we do too much. I also made some chocolate pastry for a tart I wanted to make which was a recipe from Tom Kerridge’s series ‘Best Ever Dishes’. Click here to view and make the recipe yourself. I used the pastry recipe, and the chocolate filling recipe, but changed up the decoration, as I wanted to keep it to an autumnal theme bearing in mind the occasion. This, for me is the great thing about cooking. You can take a recipe and use it as a base and experiment and change up the decoration to give it your own personal creative flare, make it your own.

Using the spare egg whites, left over from the pastry I decided to make some meringue mushrooms. I had an idea influenced by the Meringue Girls, and also Rachel Khoo’s recipe to make a ‘forest floor’. So I piped out mushrooms and dusted the tops with cocoa powder. I then assembled the bases and tops using a bit of left over ganache, once they were baked. I assembled the tart the next day.

The Saturday afternoon after our trip to London, we prepared some mini roast potatoes with rosemary, homemade guacamole, homemade salsa, and served all this with a salad, green beans, rice and sour cream with some fresh bread from Bread Ahead that we bought at the market earlier in the day. I then assembled my tart, by pouring the ganache in the case, adding the mushrooms, and added some crushed up pastry (trimmings) and some crushed amaretti biscuits to look like soil, and added some tiny mint leaves. Because of the amaretto liquor, this would go great as a dessert or a slice with coffee. It is rich and indulgent. Mum also made her signature lemon meringue pie, which always goes down a treat. After a few bottles of wine, some lovely food and lots of conversation with dear friends, they left and we headed to bed after clearing up.

Below is my tart.

A girl with an appetite for all things creative,

Maria x

Bakes and Cakes Show

Baking, Food, Inspiration

On Saturday the 25th October I went to the BBC Good Food Bakes and Cakes show at the Design Centre Islington. The day involved interviews with bakers and chefs, book signings, demonstrations, master classes, competitions, food stalls and a theatre where celebrity chefs did a demonstration.

We arrived at around 10am and began our day with a book signing with Mary Berry, she was lovely and sometimes it’s easy to forget that we are all human and we are all ‘normal’. My mum being my mum commented on her dress at the Pride of Britain awards. We then continued to listen to some interviews/question and answers with Eric Lanlard, I also watched him do a demonstration later on in the day. We browsed the food stalls and bought some sweet and savoury treats to eat. A delicious sausage bap, macaroons, brownies and meringues from the Meringue Girls.

We then sat and watched a question/answer interview with John Whaite (Bake Off winner 2012) , who was extremely funny, and had a good relationship with his friend and interviewer Jo Wheatley (Bake Off winner 2011). We then watched a demonstration by the Meringue Girls, who I had the pleasure of meeting. Read more about this here.

The day ended with watching Mary Berry in the Bakes and Cakes Theatre, where she made a chocolate roulade, and some apple muffins. Chocolate roulade is a family favourite in our home, we have it every year on christmas eve. It is a tradition, and one I hope to carry on in the future.

My mum and I then went to dinner in the evening, to Gourmet Burger Kitchen. I had the Salvador, a pork and chorizo burger, with avocado, garlic mayo, fiery chipotle ketchup, crispy onions, in a brioche bun. Finished off with my favourite oreo cookie milkshake.

After a long, but thoroughly enjoyable day we headed home and crashed out on the sofa reading my new Mary Berry cookbook.

A girl with an appetite for all things creative,

Maria x

Meringue Girls

Baking, Food, Inspiration

My instagram feed is full of all things food related, or photography related mixed in with the occasional selfie. (Probably more selfies than I’d like to admit) I follow David Loftus, who photographs for Jamie Oliver, and through this stumbled across a company called the Meringue Girls, founded by trained chefs Alex Hoffler and Stacey O’Gorman after working together in a restaurant in Hackney. “We bonded over our love of sweet things, especially meringues”. They make brightly coloured meringue ‘kisses’ in an assortment of flavours. They are stocked in Selfridges and Harvey Nichols, as well as working with a variety of other clients. They also do food styling. 

I was lucky enough to meet them at the BBC Good Food Cakes & Bakes show, which you can read about here. I watched them do a demonstration, and spoke to them afterwards and showed them a cake I made which was inspired by their work. I am now doing some baking with them in January at their bakery in Hackney. I’m super excited for this, and hopefully it may result in a career in the food industry somehow, as I feel right now this is all I want to be doing! Food and cooking relaxes me, and is one of the only activities where I forget the stress of reality and feel in a world of my own.

A girl with an appetite for all things creative,

Maria x

Hello!

Baking, Food, Inspiration, Photography, Recipes

Welcome to my blog. I plan on talking about and sharing my food experiences with you all. This will include products or produce I have seen, my own recipes and things I have made, as well as places I have eaten and enjoyed and want to share with whoever wants to hear about it.

Currently studying a BA in photography and film, and having studied and been passionate about art from a young age, I have developed an appreciation for aesthetics and all things creative. This combined with living in a family where food is a central component, my thoughts are consumed with all things food, cooking and of course the eating too (I don’t even mind washing up at times)! These two things have naturally led me to set up a food blog and see where it may take me.

Thanks for reading,

A girl with an appetite for all things creative,
Maria x